They always grumble but I make them do it anyway.
With the whole tribe together on Christmas Day and Charlie celebrating her first, I grabbed the chance to get those photos you regret not taking when you no longer can. Four generations: my in-laws with their three children, their spouses, the nine grandchildren, two partners and a great grandchild.
Please Visit My Other Places on the Web
Thursday, December 26, 2013
Wednesday, December 25, 2013
Monday, December 23, 2013
How our family get together at Christmas
Like all good traditions, ours evolved.
There comes a time - hard though it seems to believe - that your children don't tumble out of bed at stupid o'clock on Christmas morning. All those years of being up with (before) the sun do end and before you know it, you are pleading with teens to get out of bed so you can open presents and eat breakfast in good time before heading out to lunch with the extended family.
Even if, as in our case, that family celebration is (technically) only walking distance from home!
My mother-in-law runs a tight ship and Christmas lunch is on the table, getting cold, at 12 noon! A full roast with all the trimmings is a lot to face when you are still digesting the big breakfast that has become part of the special day. So - what to do?
We started to have breakfast for dinner on Christmas Eve!
It has always been a favourite time for me - Carols By Candlelight on the telly and candles glimmering around the house and we tended to gather then anyway. And I had always told my children I never wanted Christmas Day to be a tug-of-war for them: with love comes a second family and juggling everyone's expectations causes too much stress for my liking. Christmas Eve never seems in demand in other families, so it has worked well as ours has extended.
So now, as their work-day ends, our family gather with presents and expectations of a dinner entirely consisting of breakfast foods!
The menu generally remains the same -
- Bacon and eggs - whatever way you choose. With sides.
- French toast
- Buttermilk pancakes with maple syrup and/or blueberry sauce
- Waffles
- Croissants
- Summer berries
- Muffins/toast/fruit toast
- Fresh orange juice
- Tea/coffee
Most of the provisions can be stocked up before the day, with just the freshest needing a trip on the day. Some preparation can be done in the morning and the kitchen becomes the base of short-order chefs as the day goes on.
Any leftovers are just the thing in the morning, when you only need enough to take the edge of your hunger before lunch.
Over the years, as friends find out what we do, they have started to do it too!
Thursday, December 19, 2013
29 Years of Santa Photos
Heartwarming Photos Of Two Brothers Who Have Taken A Picture With Santa Together For 30 Years |
Because a lot of my Friends know our family are right there with these guys, on their tails and chasing them!!
They started in 1980, our first was in 1984. They are a family of two sons, ours has two daughters and a son.
Their photos are always together. Ours too - except the two years my eldest daughter was in New Zealand and she got her photos done separate to her siblings.
They have a jump on us with the next generation but we are all over them with including the incomers!
So, here is OUR take on the Santa photos:
1984 - Melissa aged nine months, calm after a fair bit of desensitising leading up to the day! |
1985 - extremely hot weather and a slightly over it toddler |
1986 - Mum had to be there, along with teddy! |
1987 - two photos, two Santas - before we knew we wanted shared pics |
1988 - the only tears we have ever had! Learned not to do it after the playgroup end of year party. She only lost it once in place, overwhelmed at the final hurdle. |
1989 - tshirts hand painted by mummy! |
1990 |
1991 |
1992 |
1993 |
1994 |
1995 - Melissa has finished primary school |
1996 - Santa "What have you got poking out of your shirt?" Melissa (mortified) "My bra!!!" |
1997 |
1998 - first year of digital technology - printed on the spot!!! |
1999 |
2000 |
2001 - Melissa has finished high school |
2002 |
2003 - it was around this time the challenge was issued - how long could they continue? |
2004 |
2005 - At Home: Kaitlyn has finished high school and ... |
.... there is a new boyfriend! (decided to a separate photo, prevent awkward break-up issue!) |
2005 - and in New Zealand: making mothers cry in the shopping mall!! |
2006 - Boyfriend still on the scene so makes it into photo |
2006 - another shopping centre in New Zealand for the back-packer |
2007 - back together again and that boyfriend still around! |
2008 |
2009 - Santa, look - we're getting married!! And Kieran has finished high school! |
2010 - Sorry Santa, my HUSBAND had to work today!! |
2011 - Sorry again Santa, hubby at work this year too! |
2012 - Santa, Santa - we're having a BABY!!! |
2013 - Santa, isn't she gorgeous? |
2013 - Nice to meet you Santa, shall we start our own tradition too? |
The visit to our city to queue and have the photo taken has become one of our strongest Christmas traditions. Working it around work shifts, travel and other commitments has been no easy matter. As mum, I have not insisted on this all happening - all I did was jokingly dare them one day that they couldn't keep it up until they had their own kids to be photographed with Santa. That accepted, met and bettered that dare! And are they ready to stop? No way - they are just getting started!!!
For the record, 29yo daughter and 22yo son are both single! Prospective partners really do need a good sense of humour! Applications c/- the North Pole.
Since the early nineties, the photos have been at David Jones, Melbourne. We queue up along with all the families with babies, toddlers, tweens and teens. The reluctant ones can barely contain their shock at the prospect of STILL doing this as adults and their parents think it funny to hold our family up as an example to follow. We occasionally meet another family with similar intentions but have not yet met another with adult children, their spouses and children taking part. Santa's little helpers think it is great fun ... as long as everyone fits in the room!!!
Merry Christmas!
Wednesday, December 18, 2013
How I made a babywearing demo doll
I wanted to make a demo doll to use at our babywearing sling-meets as it is by far safer for teaching and learning to use than a real baby. However, finding a tutorial on how to go about it wasn't the simple Google search I expected it to be! Eventually, I managed to piece together the process from various instructions I found (some quite vague!), so I thought I would try to pay-it-forward to the next person searching and create the tutorial I would have liked to find!!!
I "met" my first weighted baby at a meet a couple of weeks ago and was staggered by how heavy she was (granted, I didn't know she had arrived and she had identical siblings their, non-weighted, who I thought I was quickly grabbing!!) and learned that they do seem much heavier than a baby of equivalent weight - because they have no muscle-tone, they are a dead-weight! So even though the doll is roughly half the weight of my 8.6kg granddaughter, it seems heavier to hold! Once you put them into a carrier though, the weight is supported and feels like the 4kg baby it replicates. It's the same science that explains why your sleeping 2yo feels so much heavier to carry!
What you need:
I made four pouches at 250gms for the arms and legs and two at 500gms for the torso
Step Seven:
Working one at a time, push each limb pouch into place and add stuffing around and over it.
Step Eight:
Fill the upper chest and shoulders but make sure the unsupported head can still sag when you hold it upright.
Step Nine:
Add the chest body pouch and stuff around it.
Step Eleven"
Double-thread your needle (thread and then tie the two ends in one knot) and begin stitching. If your doll has a seam reinforcing strip like mine, incorporate it to add strength. I stitched through mine on each pass.
Step Twelve:
Squish everything into place a bit more until you are happy or bored!
Step Thirteen:
Dress your doll! Mine still needs a nappy. And a name!!!
I "met" my first weighted baby at a meet a couple of weeks ago and was staggered by how heavy she was (granted, I didn't know she had arrived and she had identical siblings their, non-weighted, who I thought I was quickly grabbing!!) and learned that they do seem much heavier than a baby of equivalent weight - because they have no muscle-tone, they are a dead-weight! So even though the doll is roughly half the weight of my 8.6kg granddaughter, it seems heavier to hold! Once you put them into a carrier though, the weight is supported and feels like the 4kg baby it replicates. It's the same science that explains why your sleeping 2yo feels so much heavier to carry!
What you need:
- A toy baby doll - I got mine from Kmart for $15. As it is almost Christmas, they were in abundance. It is classed as a "Newborn doll" but I hope you never have to birth a baby that size and length!
- A pack of aquarium stones/gravel - I bought mine at the garden centre, a 5kg pack was $10.95
Tools:
- A seam ripper or scissors
- Kitchen scales
- A needle and strong thread
- Stockings or fabric to create pouches to hold the weights: I used some stuff that was packaging from shelves bought at Ikea, which I knew would come in handy! Almost anything will do
How long will it take:
You will need about an hour to complete the project. I suggest you do so without sensitive small children around - or adventurous older children who might follow your lead with said sensitive child's favourite doll!!
(I also recommend NOT listening to Rod Stewart's Christmas album in the background - there is something quite disconcerting about hearing Silent Night while pouring stones into a baby's head! Just saying!)
Step One:
Using your seam ripper or small scissors, undo the seam between the doll's legs.
Step Two:
Pull out all the stuffing from the doll!!!!
Step Three:
Measure out enough gravel to bring the head of the doll to a weight of 350gms. I did this by first popping the head on the scales and adjusting it back to zero, then adding stones til it weighed enough. I don't think this is critical!!!
Step Four:
Pour the stones into the head! You could use a funnel but I couldn't find mine - wasn't a drama
Step five:
Stuff filling into the head to stop the stones coming out.
Step Six:
Prepare the pouches. I thought about sewing these and then decided I couldn't see why I should and tied them in bundles instead.
Roughly cut fabric into size |
Line the bowl with the fabric |
Add the weight of stones for that pouch |
Tie knot A |
Tie knot B |
Step Seven:
Working one at a time, push each limb pouch into place and add stuffing around and over it.
Fill the upper chest and shoulders but make sure the unsupported head can still sag when you hold it upright.
Step Nine:
Add the chest body pouch and stuff around it.
Step ten:
Add the last pouch in the area of the doll's bum and stuff around it.Keep stuffing until there is none left!
Step Eleven"
Double-thread your needle (thread and then tie the two ends in one knot) and begin stitching. If your doll has a seam reinforcing strip like mine, incorporate it to add strength. I stitched through mine on each pass.
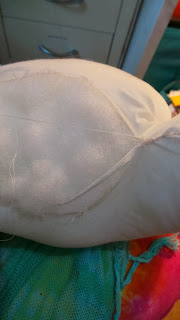
Thankfully, my caesareans were not DIY!! The thread is blackend from dirt on the stones!! |
Step Twelve:
Squish everything into place a bit more until you are happy or bored!
The head flops unsupported, with the chin touching the chest. This allows you to show how the airway can be blocked by incorrect wearing. Also useful to demonstrate breastfeeding position! |
Dress your doll! Mine still needs a nappy. And a name!!!
This doll is not intended as a toy and obviously those stones could be a choking hazard if I child could get to them. Use and store your demo doll like a responsible adult. (And consider how others who don't know it is a doll will react if they see it shoved in the back of your car!!)
Subscribe to:
Posts (Atom)